THE GUIDE
~ Links open in a new tab so you can keep your place within this guide ~
Begin
First things first, youre gonna go to the yt-dlp download page. Yes, its on github but I'll show you exactly what to click and the link will take you to the exact spot you need to be at.
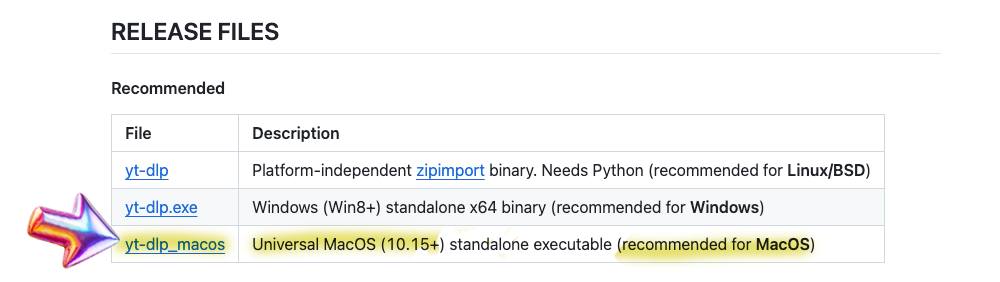
Open the Release Files section of https://github.com/yt-dlp/yt-dlp and find the file for Mac.
- Download the yt-dlp_macos file
- Leave it in your
 Downloads folder
: Some of the time you will have to open or save to the actual Downloads folder on your computer, other times you will reference it through a command.
When you see
Downloads used, you should open the actual folder.
Open Terminal
Terminal should be in your Applications in the Utilities folder, but if it isn't then just use Spotlight to find it.
1. Check for Homebrew. You probably don't have it but this is how I did it so you have to too.
- Type or paste: brew --version
- Press
 Enter.
If you see a version number (e.g,
Homebrew 4.2.14), you can skip Install Hombrew and go to Step 3. If you get an error like
 command not found: brew
, go to
Step 2.
There might be a chance you already have tried installing Homebrew years ago in an attempt to do some Windows-only shit and then eventually gave up like I did because you didnt have a bitching guide like this one. Homebrew does a fuckton of stuff, its like a bootleg command-line app store..
Setting up Homebrew
2. Install
Homebrew.
- Paste: /bin/bash -c "$(curl -fsSL https://raw.githubusercontent.com/Homebrew/install/HEAD/install.sh)"
- Press Enter.
→ If you are asked to enter you Password and see a little key icon

, just start typing it and press
Enter.
You don't always get a flashing cursor in Terminal to indicate where and when you can type. Similarly when typing in commands you will have to navigate with your keyboard arrows instead of clicking where you want to make changes.
 Tip: Just pretend Terminal doesnt have a mouse input (because it doesn't).
- This step takes a little while so don't be perturbed if it seems to stagnate at Installing Command Line Tools for Xcode. Just ride it out until you see a bunch of text that ends with Further documentation: https://docs.brew.sh
3. Check Homebrew
- Type or paste: brew doctor
- If you see the text below, you're good to go. Proceed to Step 4
- If you see zsh: command not found: brew , paste the following lines:
- Paste: echo 'eval "$(/opt/homebrew/bin/brew shellenv)"' >> ~/.zprofile
- Press Enter
- Paste: eval "$(/opt/homebrew/bin/brew shellenv)"
- Press Enter
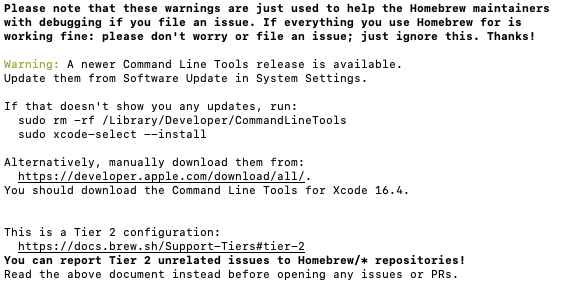
- Type or paste: brew doctor You should now see the above text block. yes, it's kind of confusing that it says Warning and whatnot, just think of this as a disclaimer.
Install YT-DLP
4. Install
yt-dlp using
brew commands.
- Type or paste: brew install yt-dlp
- Press Enter.
4a. Verify Installation
- Type or paste: yt-dlp --version
- Press Enter.
- You should see the version number of yt-dlp. It will look like a date e.g., 2025.07.21
Test YT-DLP
5. Tell
Terminal to go to your Downloads folder.
- Type or paste: cd ~/Downloads
- Press Enter.

→ If you don't designate your 'Downloads' folder, then
yt-dlp is going to save videos in the top-level folder of your hard drive (i.e., where the Applications, Library, System Users folders live).
If this happens, click on the name of your computer under 'Locations' in the left-sidebar of any Finder window to check
6. Test using a random video link! Replace your link inside the quotes below (or use the samples as-is).
Full Video
- Type or paste: yt-dlp -f mp4 "https://www.youtube.com/watch?v=iEMTWMWEXbY"
- Press Enter.
Audio-only
- Type or paste: yt-dlp -x --audio-format mp3 "https://www.youtube.com/watch?v=-4nSZ79fXO8"
- Press Enter.
Go check your
Downloads folder!

You can now drag your video to wherever you want!
If this is all you want to do -that is, download video and audio from youtube- then you're done! From now on, whenever you want to download a video, you will only have to enter two command lines into Terminal (Step 5, Step 6) and it will magically appear your Downloads folder!
→ Click here for a handy command-line sheet to download videos for free in perpetuity
But if you want to get into that hot shit and download foreign videos with English subtitles embedded, follow on to the next section.
You are welcome to stop here if you'd like and start a new Terminal session later for the instructions on adding captions to your videos. Or, if you want to get everything set up at once, you can continue to use the same Terminal session in the next step!.
Adding Captions
Install FFmpeg
7. Install FFmpeg in the same or new Terminal session
→ If you are continuing from the same session, type
cd and press
Enter to hop out of your Downloads folder (we will return to the Downloads folder in the next step). If starting new session, yr good 2 go.
- Type or paste: brew install ffmpeg
- Press Enter.
7a. Verify
FFmpeg
- Type or paste: ffmpeg -version
- Press Enter.
- It should say a bunch of shit starting with ffmpeg version 7.1.1 Copyright (c) 2000-2025
Did it work? It should have.
Download a Video with Captions to Videos
8. Point back to your Downloads folder
- Type or paste: cd ~/Downloads
- Press Enter.
8a. Enter embed caption command
To download a video as an .mp4 with English captions embedded:
- Type or paste: yt-dlp -f mp4 --write-subs --sub-langs en --embed-subs "https://www.youtube.com/watch?v=dQw4w9WgXcQ"
- Press Enter.
- Go check your Downloads folder.
- You should see your .mp4 and a .vtt file. The .vtt file will contain a text copy of the captions. This is the standard way yt-dlp delivers captions. But now that you have ffmpeg, the captions should be bound to your video. To test this, open your video in Quicktime Player. Go to View>Subtitles>English
To download a video as an .mp4 and get a copy of auto-generated captions
(useful as a make-shift transcript):
- Type or paste: yt-dlp -f mp4 --write-auto-subs "https://www.youtube.com/watch?v=dQw4w9WgXcQ"
- Press Enter.
To check and set captions for another language:
- Type or paste: yt-dlp --list-subs "https://www.youtube.com/watch?v=dQw4w9WgXcQ"
- Press Enter.
- You will see a huge list of language codes.
Note: we did not use -f mp4 in the previous command, so we are only getting info, not downloading the video.
- At the very end of the list, you will see what captions are available for your video.
- Copy the short-hand language code and replace the "en" in --sub-langs en with your preferred language code.
The example below uses ja for Japanese subs:
- Type or paste: yt-dlp -f mp4 --write-subs --sub-langs ja --embed-subs "https://www.youtube.com/watch?v=dQw4w9WgXcQ"
- Press Enter.
Once you get the hang of it you will be able to intuit how to mix-and-match commands
When your files are downloaded you can then move them out of the Downloads folder to anywhere you want.
Doing it again
Now that you have
Homebrew, and installed
yt-dlp and
FFmpeg (which I always read as mpreg), you can download as many videos as you want and do a whole lot more- the latter of which im not equipped to teach. From now on, whenever you want to snag a video, here is what you will do:
1. Open Terminal
2. Designate the Downloads folder using cd ~/Downloads and pressing Enter.
 Remember: We always want to tell Terminal to put stuff in the Downloads folder first. That way, things don't end up at the top of our Hard Drive. Which is another way to say, if you think you did everything right and don't see your file, check there.
3. Give one of the following commands and press Enter:
| Video | yt-dlp -f mp4 "https://www.youtube.com/watch?v=iEMTWMWEXbY" |
| Audio Only | yt-dlp -x --audio-format mp3 "https://www.youtube.com/watch?v=-4nSZ79fXO8" |
| Video w/ Embedded Subs | yt-dlp -f mp4 --write-subs --sub-langs en --embed-subs "https://www.youtube.com/watch?v=VbXSjuk-7GU" |
More Commands
Mix-and-match these with the above commands, by inserting them before the url, separated by a space.
| --no-playlist | Download only the video, if the URL refers to a video and a playlist |
| --yes-playlist | Download the playlist, if the URL refers to a video and a playlist ** |
| --write-thumbnail | Download thumbnail image |
| --embed-thumbnail | Embed thumbnail in the video as cover art |
| --write-auto-subs | Write automatically generated subtitle file (when official subs arent available) |
| --live-from-start | Download livestreams from youtube and twitch |
** For example, if you want to download all the songs in a playlist as mp3s,
→ Go to the first video of the playlist and insert the url into the following:
yt-dlp -x --yes-playlist --audio-format mp3 "https://www.youtube.com/watch?v=LI_mwl3QcYA&list=PL001A1024CB49F661&index=1"
Go ahead and bookmark this page if you think you'll need it.


Alternatively, you can copy-paste the text below into a .txt file or note to use as a Quick Instructions guide:
Want more?
Check out the resources on the
yt-dlp github page. Start with the
Usage and Options section to browse commands. Here you can learn how to download a copy of the comments, video descriptions, and a whole lot more.
To see what else
Homebrew can install, check out the
Cask page.
Learn more about
FFmpeg and its many
commands, like video format conversion.
Essentially, you've just installed several extremely versatile products just by typing in a few commands, all for free! Who knew? While we did it just to bind subtitles to youtube videos, you can actually do a shitload with these three, together and separately. Not to overwhelm you, but yt-dlp is actually compatible with a THOUSAND+ websites.
Final Step

Congratulate yourself big boy! You did a thing today!
